

How to Use the Built-in Laser Pointer in PowerPoint (with Shortcuts)

Display a Laser Pointer During a PowerPoint Slide Show (and Choose Red, Green or Blue Pointers)
by Avantix Learning Team | Updated September 14, 2023
Applies to: Microsoft ® PowerPoint ® 2010, 2013, 2016, 2019, 2021 and 365 (Windows)
During a PowerPoint slide show, you can change your mouse into a laser pointer to focus attention on a specific area on your slide. You can show or hide the built-in laser pointer using keyboard shortcuts or by using the context menu.
Recommended article: 10 PowerPoint Slide Show Tips and Tricks
Do you want to learn more about PowerPoint? Check out our virtual classroom or in-person classroom PowerPoint courses >
There are 4 common ways to start a slide show in PowerPoint:
- Click the Slide Show button on the bottom right of the screen
- Click the Slide Show tab in the Ribbon and click From Beginning or From Current Slide
- Press F5 to start a slide show from the beginning
- Press Shift + F5 to start a slide show from the current slide
Change the mouse into a laser pointer using a keyboard shortcut
To change the mouse pointer into a laser pointer using a keyboard shortcut:
- Start a slide show.
- To display the laser pointer, press Ctrl + L. Press ESC to hide it.
Change the mouse into a laser pointer by dragging
To change the mouse pointer into a laser pointer by dragging:
- Press and hold Ctrl and then click and drag the left mouse button to point to the contents on the slide that you want to focus on.
Change the mouse into a laser pointer using the context menu
To change the mouse pointer into a laser pointer using the context menu:
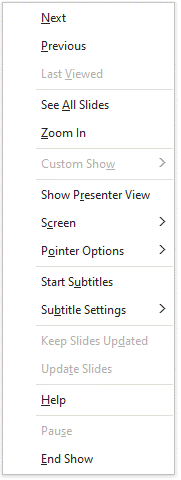
- Right-click on the slide. A drop-down menu appears.
- Select Pointer Options and then Laser Pointer.
- Press ESC to hide the laser pointer.
The context menu appears as follows when you right-click during a slide show:
Change the color of the laser pointer
By default, the laser pointer is red. However, you can change it to green or blue.
To change the color of the laser pointer:
- In Normal View or Slide Sorter View, click the Slide Show tab in the Ribbon.
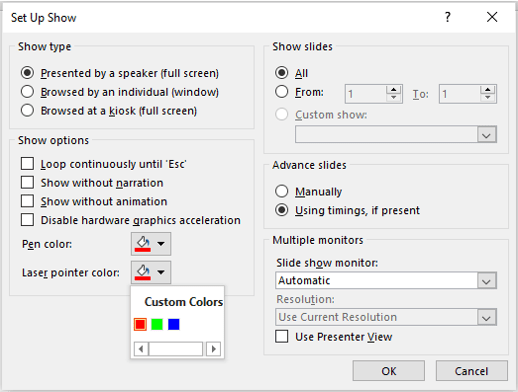
- In the Set Up group, click Set Up Slide Show. A dialog box appears.
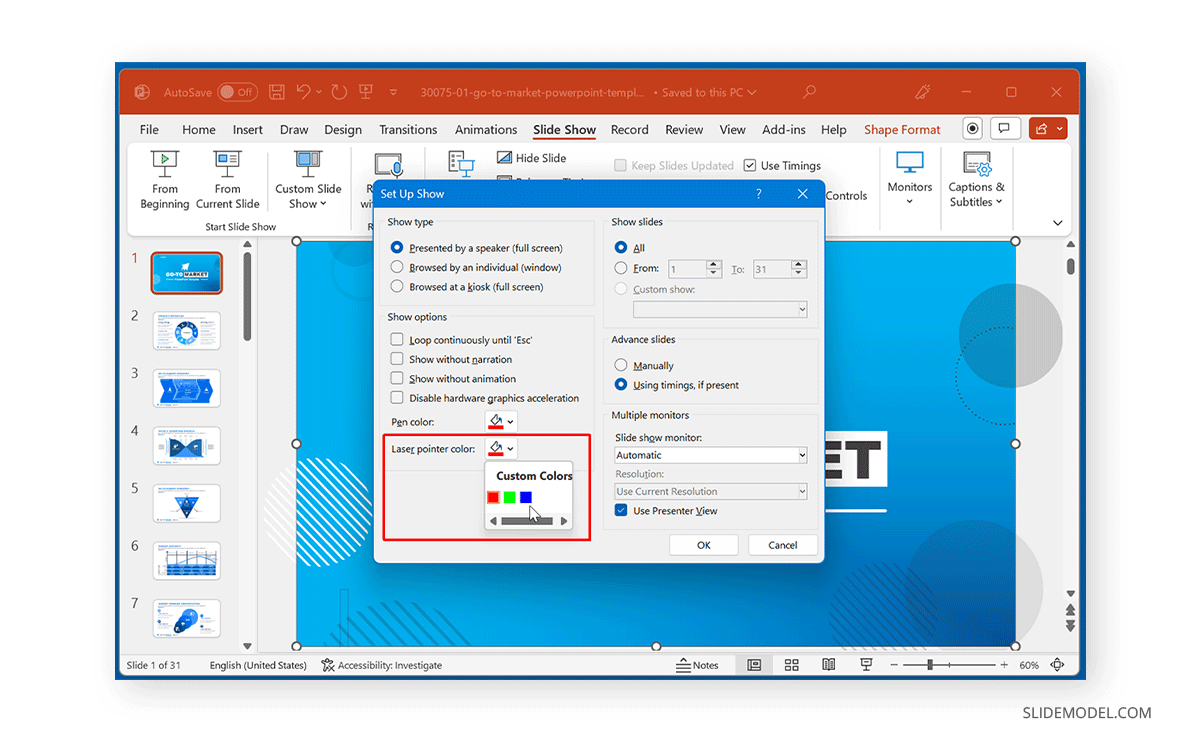
- Under Show options, select the color that you want from the Laser pointer color drop-won menu.
The Set Up Show dialog box appears as follows:
Record laser pointer movements
To record your laser pointer movements for a self-running slide show:
- Click the Slide Show tab in the Ribbon.
- In the Set Up group, click the arrow beside or below Record Slide Show. A drop-down menu appears.
- Click either Start Recording from Beginning or Start Recording from Current Slide. If a dialog box appears, select the Narrations and laser pointer check box.
- Click Start Recording or Record. To pause the narration, in the recording controls, click Pause. To resume, click Resume.
- Display the mouse pointer using the methods outlined above. Press ESC to hide the pointer.
- Click the right arrow to move to the next slide.
- Move through the presentation and show and hide the laser pointer when needed.
- To end the slide show recording, right-click the slide and then click End Show. The recorded slide show timings are automatically saved and the slide show appears in Slide Sorter view with timings below each slide.
- To view the slide show with the pointer movements and timings you recorded, on the Slide Show tab, in the Start Slide Show group, click From Beginning or From Current Slide.
- To redo the laser pointer movements or slide timings, repeat the steps above.
You can also display a pen or highlighter during a slide show. Check out the article How to Highlight or Draw on PowerPoint Slides During a Slide Show.
Subscribe to get more articles like this one
Did you find this article helpful? If you would like to receive new articles, JOIN our email list
More resources
How to Change the Font on All Slides in PowerPoint
How to Hide or Unhide Slides in PowerPoint (with Shortcuts)
How to Insert a Video in PowerPoint (from a File or Your PC or Shared Drive)
Where to Find Free Pictures for PowerPoint Presentations (10 Great Stock Image Sites)
How to Add Animation in PowerPoint (Animate Images, Text and Other Objects in PowerPoint)
Related courses
Microsoft PowerPoint: Introduction
Microsoft PowerPoint: Intermediate / Advanced
Microsoft PowerPoint: Design for Non-Designers
Microsoft PowerPoint: Animations Bootcamp
VIEW MORE COURSES >
Our instructor-led courses are delivered in virtual classroom format or at our downtown Toronto location at 18 King Street East, Suite 1400, Toronto, Ontario, Canada (some in-person classroom courses may also be delivered at an alternate downtown Toronto location). Contact us at [email protected] if you'd like to arrange custom instructor-led virtual classroom or onsite training on a date that's convenient for you.
Copyright 2024 Avantix ® Learning
You may also like

How to Insert or Type the Copyright Symbol in PowerPoint (4 Ways with Shortcuts)
You can insert or type the copyright symbol (©) in PowerPoint using the Insert Symbol command or by using keyboard shortcuts. In this article, we'll review 4 ways to insert the copyright symbol in PowerPoint. You can insert the copyright symbol in Normal View or Slide Master View.

How to Insert or Type U with an Accent Mark in PowerPoint (Ù, Ú, Û, Ü, ù, ú, û, or ü)
You can insert or type u with an accent mark in PowerPoint using built-in tools or keyboard shortcuts (including Alt code shortcuts). The letter u can be inserted with an accent in both upper or lower case. The following are common accented characters that you can insert or type in PowerPoint in upper or lower case: grave (Ù or ù), acute (Ú or ú), circumflex (Û or û) and umlaut (Ü or ü).

How to Insert or Type O with an Accent Mark in PowerPoint (Ò, Ó, Ô, Õ, Ö, ò, ó, ô, õ or ö)
You can insert or type o with an accent mark in PowerPoint using built-in tools or keyboard shortcuts (including Alt code shortcuts). The letter o can be inserted with an accent in both upper or lower case. The following are common accented characters that you can insert or type in PowerPoint in upper or lower case: grave (Ò or ò), acute (Ó or ó), circumflex (Ô or ô), tilde (Õ or õ) and umlaut (Ö or ö).
Microsoft, the Microsoft logo, Microsoft Office and related Microsoft applications and logos are registered trademarks of Microsoft Corporation in Canada, US and other countries. All other trademarks are the property of the registered owners.
Avantix Learning |18 King Street East, Suite 1400, Toronto, Ontario, Canada M5C 1C4 | Contact us at [email protected]
Our Courses
Avantix Learning courses are offered online in virtual classroom format or as in-person classroom training. Our hands-on, instructor-led courses are available both as public scheduled courses or on demand as a custom training solution.
All Avantix Learning courses include a comprehensive course manual including tips, tricks and shortcuts as well as sample and exercise files.
VIEW COURSES >
Contact us at [email protected] for more information about any of our courses or to arrange custom training.
Privacy Overview
Pin it on pinterest.
- Print Friendly
Home Blog PowerPoint Tutorials How to use Laser Pointer in PowerPoint
How to use Laser Pointer in PowerPoint

The laser pointer tool in PowerPoint can help highlight key areas on a slide without buying additional hardware to present your information or spending time making parts of your PowerPoint templates more eye-popping. This virtual laser pen can be activated in Slide Show mode in different colors to provide the laser pointer effect for your slideshow instantly.
How to Activate PowerPoint Laser Pointer
To activate the laser pointer tool, switch to Slide Show mode via the viewing modes at the bottom, via the Slide Show tab, or by using the F5 hotkey. Right-click on the slideshow and go to Pointer Options -> Laser Pointer . You can also turn your mouse pointer into a laser pointer by holding the CTRL (Windows) key or Command (Mac) key with the left mouse click.
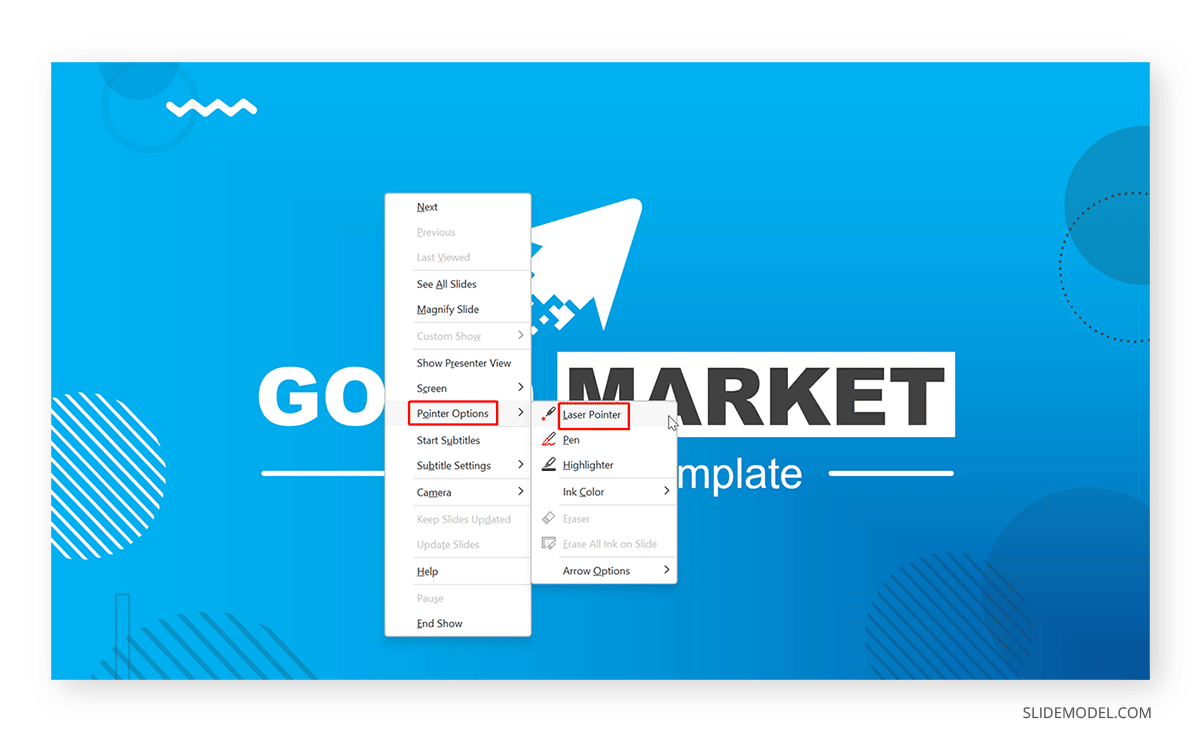
This will activate the PowerPoint laser pointer you can now use by moving the mouse or touchpad.

How to Deactivate Laser Pointer
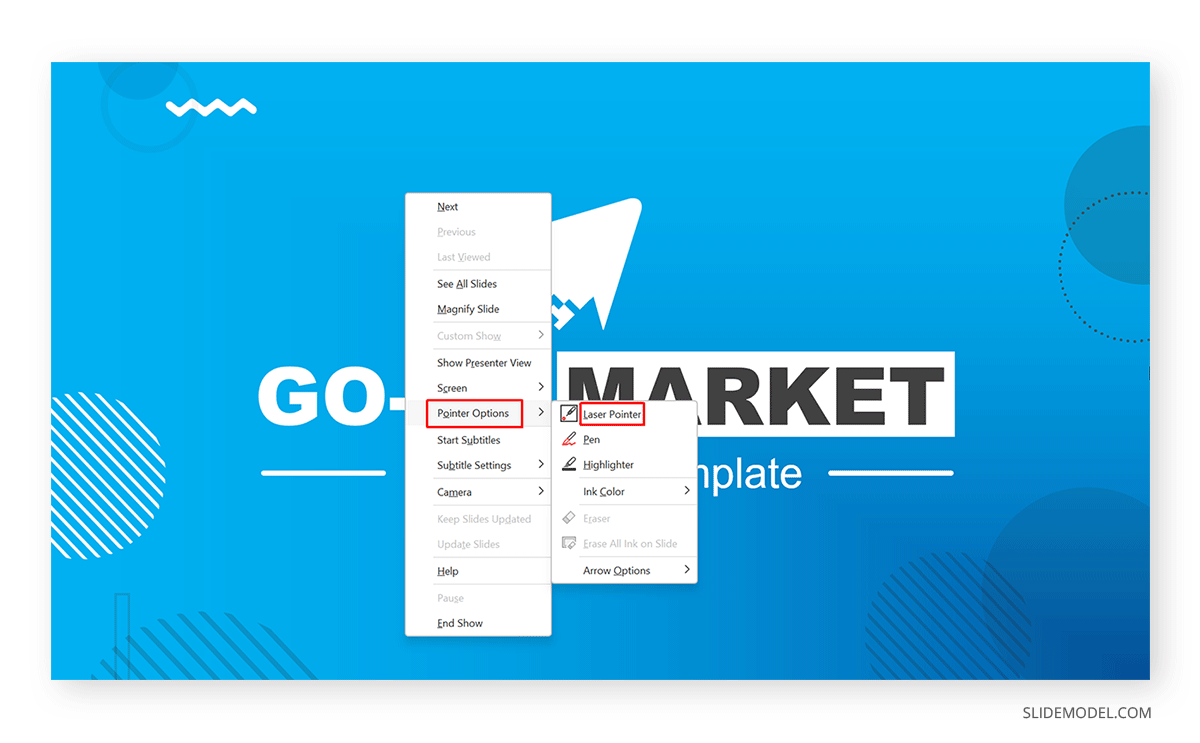
You can deactivate the laser pointer by hitting Esc on your computer or via the right-click menu by going to Pointer Options -> Laser Pointer .
How to Change Laser Pointer Color in PowerPoint
To change the color of the laser pointer, go to Slide Show -> Set Up Slide Show.
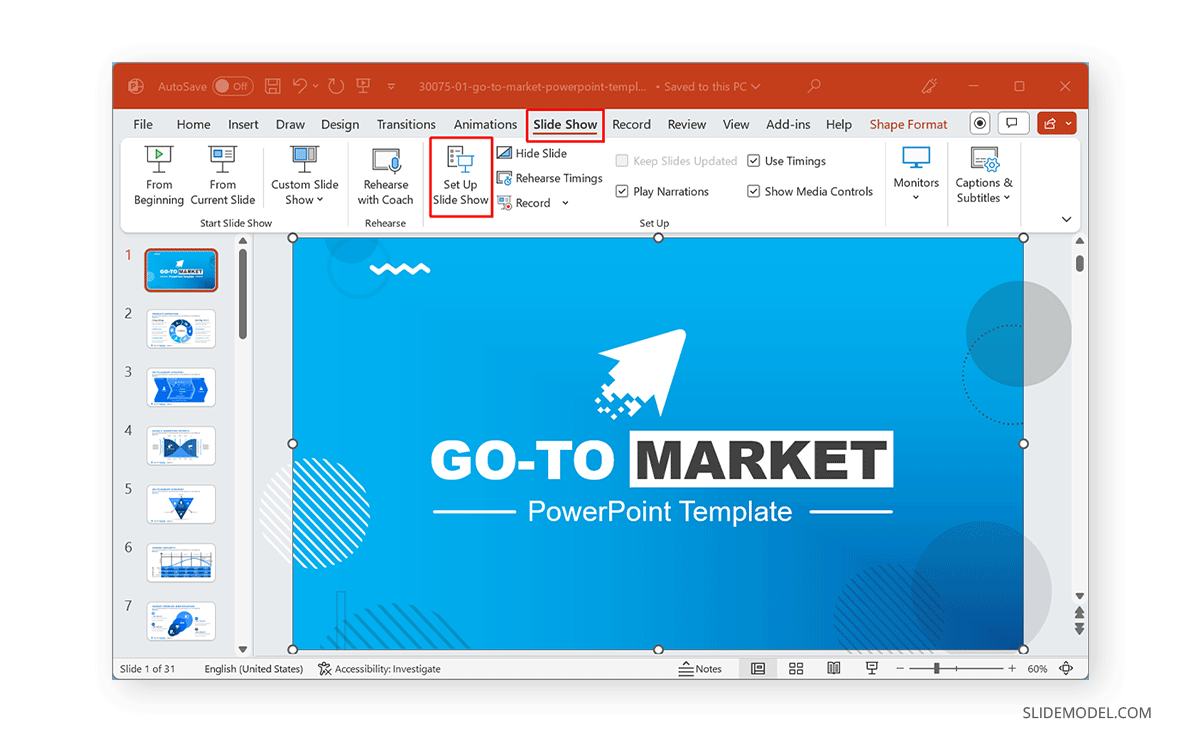
Select a color from the Laser pointer color menu. The available colors include red, blue, and green. Red, by default, is the color used for the laser pointer in PowerPoint unless it is changed from the Laser pointer color menu via Set Up Slide Show from the Slide Show tab.
The Laser Pointer tool in PowerPoint is a virtual feature that allows you to highlight key areas on a slide during a presentation without needing a physical laser pointer. It can be activated in Slide Show mode and used to direct your audience’s attention.
To activate the Laser Pointer, switch to Slide Show mode and right-click on the slide. Then, go to Pointer Options -> Laser Pointer. Alternatively, you can press the CTRL (Windows) or Command (Mac) key while holding down the left mouse button.
You can deactivate the Laser Pointer by pressing the Esc key on your keyboard or by right-clicking on the slide, navigating to Pointer Options, and deselecting Laser Pointer.
Yes, you can change the color of the Laser Pointer by going to Slide Show -> Set Up Slide Show. Under the Laser pointer color menu, you can choose from red, blue, or green.
PowerPoint offers three color options for the Laser Pointer: red, blue, and green. Red is the default color unless you change it via the Laser pointer color menu.
Use the Laser Pointer when you need to emphasize specific parts of your slide during a presentation. It helps direct your audience’s focus to important details without requiring physical tools.
Yes, you can use the Laser Pointer with a touchpad or touchscreen device by pressing the CTRL (Windows) or Command (Mac) key and touching or clicking on the screen.
Final Words
Instead of investing in a laser pointer, you can instantly convert your mouse pointer into a laser pointer in different colors. This can help highlight parts of your slide and keep your audience engaged towards the most important bits of your content.
Like this article? Please share
Microsoft PowerPoint, PowerPoint Tips Filed under PowerPoint Tutorials
Related Articles

Filed under PowerPoint Tutorials • December 3rd, 2024
How to Insert a Company Logo into PowerPoint
Personalize your presentation slides by learning how to insert a company logo in PowerPoint. Ideal for branded presentations.

Filed under PowerPoint Tutorials • November 11th, 2024
How to Create and Use PowerPoint Triggers
Customize your presentation slides by mastering how to use PowerPoint triggers. Ideal for creating engaging slide decks.
Filed under PowerPoint Tutorials • October 29th, 2024
How to Compress Photos in PowerPoint
Make your slide decks easier to share by learning how to compress photos in PowerPoint. Ideal to optimize file sizing in your presentations.
Leave a Reply

How to Use a Pointer in PowerPoint Presentation
Trish Dixon
When delivering presentations , effectively engaging your audience can be significantly enhanced by the use of a PowerPoint pointer . A well-utilized laser pointer serves as a dynamic tool, allowing presenters to direct attention to key points on slides, making it easier for viewers to grasp and retain information. Understanding how to use a pointer in PowerPoint not only aids in highlighting essential content but also transforms an ordinary presentation into an interactive experience, captivating your audience’s interest. In this guide, we’ll explore the various features and techniques of using pointers that can elevate your presentation skills.
Introduction to Laser Pointers in PowerPoint
Laser pointers are essential tools that significantly enhance presentations by helping focus the audience’s attention on specific content. In the realm of PowerPoint features , accessing a laser pointer can be done seamlessly through your mouse cursor or keyboard shortcuts. This convenience allows presenters to emphasize key points dynamically during their delivery.
Microsoft PowerPoint integrates a built-in laser pen feature that operates without the need for additional downloads. Users can utilize this presentation tool effortlessly, making it easy to highlight vital information throughout their slides. The incorporation of laser pointers in PowerPoint distinguishes effective presentations , aiding in the overall engagement and clarity of the message.
Utilizing laser pointers can elevate the standard of your presentations, making them more interactive and informative. As you become familiar with these capabilities, you will find that they play a crucial role in maintaining audience interest and delivering impactful messages.
Benefits of Using a Pointer in Your Presentation
Incorporating a pointer, especially a laser pointer , into presentations significantly improves presentation effectiveness . This tool helps direct the audience’s focus to critical information displayed on slides. By clearly highlighting essential elements, a presenter can facilitate better retention and understanding among audience members.
Utilizing visual aids effectively plays a crucial role in maintaining audience engagement . When viewers can easily follow along with highlighted points, their interest sustains throughout the presentation. A pointer serves not only as a navigational tool but also enhances the professional feel of the delivery.
Leveraging a pointer allows presenters to steer their audience’s attention without detracting from the content. This fluid navigation keeps the flow of information seamless, fostering a more interactive and engaging presentation environment. In summary, the use of a pointer dramatically elevates both audience engagement and overall presentation effectiveness .
How to Use a Pointer in PowerPoint
Understanding how to use a laser pointer in PowerPoint can greatly enhance your presentation skills. Efficient utilization of pointer options allows presenters to effectively engage their audience while emphasizing key points. Below are essential steps to help you navigate turning on the laser pointer, employing mouse and keyboard shortcuts, and exploring pointer options .
Turning on the Laser Pointer
To activate the laser pointer in PowerPoint, begin your presentation from the Slide Show tab or opt for Reading View. Hold the Ctrl key while dragging the mouse to hide the mouse pointer. This method enables a focused view on the content, ensuring effective communication.
Using Mouse and Keyboard Shortcuts
Pressing F5 will start your slideshow, transforming the mouse cursor into a laser pointer. Right-clicking the slide presents you with various PowerPoint shortcuts to access pointer options . The selected laser pointer remains visible until you use the Escape key or choose an alternative from the right-click menu to revert back to the standard cursor.
Exploring Pointer Options
PowerPoint offers a variety of pointer options, including Pen and Highlighter modes, allowing for greater flexibility during presentations. You can customize the visibility settings of the cursor as well—options include automatic, hidden, or permanently displayed. This capability enhances the way you present content and interact with your audience.
Changing the Color of the Laser Pointer
Customizing the laser pointer’s color can significantly enhance the visibility during presentations. This option becomes particularly useful in various environments where a particular color may stand out more effectively against the backdrop. Understanding the default color settings and how to change pointer color within PowerPoint can transform the overall presentation experience.
Default Color Settings
The default color for the laser pointer in PowerPoint is red. While this color is effective in many situations, it might not always be the best choice depending on the presentation’s environment. Adjusting the laser pointer colors can help ensure your audience can easily track your focus during critical points of the presentation.
Steps to Change Pointer Color
To change the laser pointer’s color, follow these steps:
- Go to the Slide Show tab in PowerPoint.
- Select the Set Up Slide Show command.
- Locate the Laser Pointer Color dropdown menu.
- Choose your preferred color from the options, which include red, green, and blue.
Once you select a color, it remains active throughout the current presentation. Keep in mind that for subsequent presentations, the default will revert back to red, so it will be necessary to repeat these steps if a different laser pointer color is desired.
Using a Smartphone as a Pointer
In the age of technology, presenters can enhance their presentations by utilizing a smartphone as a pointer. This feature is particularly useful when operating Microsoft PowerPoint in Presenter View, which is available to users with a Microsoft 365 subscription. The integration of mobile PowerPoint controls allows presenters to seamlessly transition through slides while also highlighting key points using the laser pointer functionality.
For smartphones equipped with a gyroscope, this capability extends even further, enabling users to navigate through their presentation hands-free. If you do not have a Microsoft 365 subscription, fear not; there’s a simple workaround. By pressing and holding on the slide area, you can mimic a pointer effect, ensuring that your audience remains engaged without the need for additional devices.
Connecting your smartphone for projection can be accomplished either through HDMI adapters or wirelessly via techniques like AirPlay, Chromecast, or Miracast. This adaptability makes the smartphone pointer not only a convenient option but also a versatile tool for all levels of presenters. Embrace these Microsoft 365 features and take your presentations to the next level of interactivity and professionalism.
What is the purpose of using a laser pointer in a PowerPoint presentation?
The laser pointer helps focus the audience’s attention on specific content within the slides, enhancing engagement and retention of information.
How do I turn on the laser pointer feature in PowerPoint?
Activate the laser pointer by starting your presentation from the Slide Show tab or Reading View. Hold the Ctrl key while dragging the mouse to hide the cursor and use the laser pointer.
What keyboard shortcuts can I use with the mouse pointer in PowerPoint?
Press F5 to start the slideshow, then right-click on the slide to access Pointer Options. The laser pointer remains visible until you press the Escape key or use the right-click menu to revert back.
Can I change the color of the laser pointer in PowerPoint?
Yes, you can change the laser pointer color by going to the Slide Show tab, selecting Set Up Slide Show, and adjusting the Laser Pointer Color dropdown to your preferred choice, such as green or blue.
What are the default color settings for the laser pointer?
The default color for the PowerPoint laser pointer is red. This can be changed for specific presentations but will revert to red in future presentations unless adjusted again.
Can I use my smartphone as a laser pointer for PowerPoint presentations?
Yes, if you have a Microsoft 365 subscription, you can use your smartphone as a laser pointer while in Presenter View. Smartphones with a gyroscope can control slides remotely and highlight content.
How do I connect my smartphone for a PowerPoint presentation?
You can connect your smartphone to the presentation using HDMI adapters or wirelessly through methods such as AirPlay, Chromecast, or Miracast.
- Recent Posts
- How to Group Shapes in PowerPoint: A Step-by-Step Guide – December 9, 2024
- How to Embed a Google Map in PowerPoint Slides: Easy Guide – December 3, 2024
- How to Create a Photo Slideshow in PowerPoint: Easy Guide – November 27, 2024
Leave a Reply Cancel reply
Your email address will not be published. Required fields are marked *
Save my name, email, and website in this browser for the next time I comment.
Latest Posts
How to group shapes in powerpoint: a step-by-step guide.
Learn how to group shapes in PowerPoint for easy editing, faster formatting, and consistent designs. Step-by-step tips to streamline your presentations.
How to Embed a Google Map in PowerPoint Slides: Easy Guide
Learn how to embed interactive Google Maps in PowerPoint slides with this simple guide. Enhance your presentations with dynamic maps using two easy methods.
How to Create a Photo Slideshow in PowerPoint: Easy Guide
Learn how to create a photo slideshow in PowerPoint with easy steps, including adding transitions, animations, and music for professional results.

Powerpoint Assist
Tips for Powerpoint by Regina Griffin
How To Get Laser Pointer In PowerPoint
Have you ever wondered how to use a laser pointer in PowerPoint to enhance your presentations?
This article will guide you through the step-by-step process of getting a laser pointer in PowerPoint and provide you with additional tips for using it effectively.
From setting up your slide show to customizing your laser pointer settings, we’ve got you covered. Let’s dive in and take your PowerPoint presentations to the next level with the help of a laser pointer!
Key Takeaways:
- Learn how to use a laser pointer in PowerPoint to enhance your presentations.
- Follow the simple steps of opening the presentation, going to the Slide Show tab, and selecting the “Rehearse Timings” option.
- For more control, use a wireless presenter and customize your laser pointer settings. Practice and rehearse your presentation beforehand for a smooth delivery.

What is a Laser Pointer and How Does it Work in PowerPoint?
A laser pointer is a handheld device that emits a focused beam of light used to highlight key points during a presentation in a PowerPoint slide show.
It works by projecting a small, intense spot of light onto the screen, making it ideal for directing attention to specific details on the slide. This gadget gives the presenter the freedom to move around with ease, avoiding the need to stand next to the computer. With just a press of a button, the laser pointer can effectively emphasize important facts or figures, enhancing the clarity of the content being discussed.
How to Get a Laser Pointer in PowerPoint?
To acquire a laser pointer in PowerPoint, follow these steps to enable its functionality within your presentation.
Open your PowerPoint presentation, and navigate to the slide show mode. Once you are in slideshow mode, right-click anywhere on the slide to reveal a menu. Look for the ‘Pointer Options’ section within the menu. Click on it and select ‘Laser Pointer’ from the dropdown list. Now, a laser pointer will appear on your slide, which you can control using your mouse or touchpad.
Step 1: Open Your PowerPoint Presentation
To begin , launch your PowerPoint presentation software from the Microsoft 365 suite.
Opening PowerPoint allows you to create engaging presentations by leveraging various features and tools within the software. Upon launching, you can start a new presentation from scratch or choose from a range of pre-designed templates to kickstart your project. The integration with Microsoft 365 enhances collaboration capabilities, enabling you to work on presentations simultaneously with team members, no matter their location. This seamless integration also offers the advantage of cloud storage, ensuring that your presentations are always accessible and up to date. One of the standout functionalities of PowerPoint is its ability to create dynamic slide shows, incorporating animations, transitions, and multimedia elements to captivate your audience.
Step 2: Go to the Slide Show Tab
Next, navigate to the Slide Show tab within the PowerPoint interface.
Once you have the Slide Show tab open, you will find a plethora of options at your disposal to enhance your presentation delivery. From setting up how you want to start your show to managing annotations and accessing presenter tools, this tab serves as your control center for engaging with your audience. It also provides quick shortcuts for starting the presentation from the current slide or even rehearsing timings to ensure seamless delivery. Familiarize yourself with the tools under this tab to master the art of dynamic presentations.
Step 3: Click on the Set Up Slide Show Option
Then, select the Set Up Slide Show option to configure essential settings for your presentation.
Setting up slide shows in PowerPoint is crucial for a polished and professional presentation experience. By customizing slide timings, you can ensure that your slides transition seamlessly, allowing you to control the pace of your presentation and keep your audience engaged.
- To adjust slide timings, go to the Slide Show tab and choose the Rehearse Timings option. This feature enables you to set the exact duration for each slide, adding precision to your delivery.
- You can incorporate animations and transitions to enhance the visual appeal of your slides, making your presentation more dynamic and captivating.
Step 4: Check the ‘Show Without Narration’ Box
Ensure to tick the ‘Show Without Narration’ box to enable a streamlined presentation without recorded audio.
Configuring narration settings in PowerPoint is crucial for delivering a polished presentation that effectively conveys your message. By choosing ‘Show Without Narration’, you ensure that your audience focuses solely on the content displayed on each slide, without any distracting audio commentary. This option is especially useful when you want to share the presentation later without the need for a live speaker. Setting up this feature correctly can elevate the professional quality of your slides and deliver a more engaging experience for your viewers.
Step 5: Click on the Slide Show Tab Again
Return to the Slide Show tab to access additional functionalities and controls for your presentation.
Exploring the Slide Show tab in PowerPoint allows you to utilize advanced features that can significantly enhance the quality of your presentation. One key advantage is the integration of a gyroscope , which enables you to create interactive elements that respond to movements, captivating your audience with a dynamic and engaging experience. By leveraging this feature, you can bring a new level of interactivity to your slides, making your content more memorable and impactful. The Slide Show tab provides a range of options for customization, transitions, and navigation, enabling you to deliver a more polished and professional presentation.
Step 6: Click on the ‘Rehearse Timings’ Option
Select the ‘ Rehearse Timings ‘ option to practice and fine-tune the duration of your slide show.
When you initiate the ‘Rehearse Timings’ feature, PowerPoint will walk you through each slide, allowing you to control the time spent on each one during the presentation. As you proceed, the program records these timings, enabling you to ensure that your slide show aligns with your desired pace. Remember, seamlessly starting your slide show can captivate your audience right from the beginning, and concluding it effectively is just as crucial. Utilize the ‘Rehearse Timings’ tool to refine these key aspects and deliver a polished and engaging presentation.
Step 7: Start Your Slide Show
Commence your slide show either from the beginning or the current slide to engage your audience seamlessly.
To start your presentation from the beginning in PowerPoint, simply click on the ‘Slide Show’ tab in the menu bar, then select ‘From Beginning’. This option ensures a structured and organized flow of your content right from the start.
On the other hand, if you prefer to launch your presentation from the slide where you currently are, choose ‘From Current Slide’ under the same ‘Slide Show’ tab. This choice allows for a more spontaneous approach, focusing directly on the content you wish to highlight without any unnecessary repetition.
Other Tips for Using Laser Pointers in PowerPoint
Enhance your PowerPoint presentations further with these additional tips for utilizing laser pointers effectively.
Regarding selecting a wireless presenter, opt for one that provides a comfortable grip and intuitive button placement for seamless control during your presentation. Look for models that offer features like laser pointer customization to suit your presentation style, including various laser colors such as red, green, or blue. Utilizing different laser colors can help emphasize different points or sections, adding a dynamic element to your content delivery. Experiment with different colors to see what works best for highlighting key information and engaging your audience.
Use a Wireless Presenter for More Control
Opt for a wireless presenter to gain enhanced control and flexibility when using your laser pointer during presentations.
Wireless presenters offer a range of benefits that can significantly improve your presentation experience. With touch controls, you can effortlessly navigate through slides, adjust volume, and control other multimedia elements with ease. The remote functionalities allow you to move around the room and interact with your audience without being tied to your computer, boosting engagement and connection. The wireless technology eliminates the need for tangled cords, giving you more freedom and reducing distractions during your presentations. A wireless presenter with a laser pointer is a powerful tool that enhances your delivery and professionalism.
Customize Your Laser Pointer Settings
Personalize your laser pointer experience by adjusting settings such as laser color and ink color to match your presentation style.
Customizing the laser pointer settings in PowerPoint not only enhances the visual appeal of your slides but also adds a professional touch to your delivery. By selecting custom laser colors and ink colors that align with your brand colors or overall theme, you can create a cohesive and engaging presentation. This level of customization allows you to highlight key points effectively and keep your audience focused on the most critical aspects of your content. Matching the laser pointer colors with your presentation’s aesthetics can leave a lasting impression on your viewers, making your content more memorable and impactful.
Practice and Rehearse Your Presentation
Prioritize practice sessions to refine your presentation skills and integrate laser pointer demonstrations effectively.
Rehearsing your presentation with a laser pointer in hand not only builds confidence but also allows you to familiarize yourself with the device’s functionalities. Make sure to practice pointing smoothly and precisely to draw attention to key points without distracting your audience. Timing is crucial; use the laser pointer deliberately to emphasize important details and maintain a seamless flow throughout your presentation. Incorporating gestures and body language in sync with the laser pointer movements can enhance your delivery and engagement levels.
The integration of laser pointers in PowerPoint presentations enhances interactivity, engagement, and clarity in delivering information to the audience.
Laser pointers serve as excellent tools to draw attention to specific points on slides, making it easier for the audience to follow along. The versatility of laser pointers allows presenters to highlight key information, reinforce important details, and navigate through content seamlessly. This dynamic visual aid helps maintain audience focus and ensures a smooth flow of the presentation.
With a laser pointer, presenters can emphasize crucial data, guide the audience’s focus, and create impactful transitions between different sections. The precision and effectiveness of laser pointers play a vital role in enhancing the overall quality and professionalism of the presentation, leaving a lasting impression on viewers.
For further exploration and in-depth understanding, refer to these resources related to presentations, projectors, and the latest versions of presentation software.
When honing your presentation skills, it’s crucial to understand the latest trends and technologies shaping this field. Stay updated by following industry experts’ blogs, such as Presentation Guru and Duarte Blog, both offering valuable insights and tips for creating impactful presentations.
Exploring websites like SlideShare and TED Talks can provide inspiration and innovative ideas. To gain a deeper insight into projector technologies, consider checking out resources by Projector Reviews and Projector Central for detailed reviews, comparisons, and buying guides.
For the latest updates on presentation software, regular visits to the official websites of PowerPoint, Keynote, and Google Slides are recommended to stay informed about new features and enhancements.
Frequently Asked Questions
What is a laser pointer in powerpoint.
A laser pointer in PowerPoint is a feature that allows you to use your mouse as a virtual laser pointer during a presentation. This can help highlight important information on a slide.
How do I get a laser pointer in PowerPoint?
To get a laser pointer in PowerPoint, simply click on the “Slide Show” tab at the top of the screen. Then, click on the “Set Up Show” button and check the box next to “Use Pen as Pointer.” This will enable your mouse to act as a laser pointer during your presentation.
Can I change the color of the laser pointer in PowerPoint?
Yes, you can change the color of the laser pointer in PowerPoint. To do this, click on the “Slide Show” tab and then click on “Set Up Show.” From there, you can choose a different color for your laser pointer under the “Laser Pointer Color” option.
What if I don’t have a mouse with a laser pointer?
If you don’t have a mouse with a laser pointer, you can still use this feature in PowerPoint. Simply press the “Ctrl” key and hold it down while clicking your left mouse button. This will activate the laser pointer on your screen.
Can I use the laser pointer in PowerPoint for a remote presentation?
Yes, you can use the laser pointer in PowerPoint for a remote presentation. However, you will need a mouse with a built-in laser pointer or a separate laser pointer device to use during the presentation.
Is the laser pointer feature available on all versions of PowerPoint?
No, the laser pointer feature is not available on all versions of PowerPoint. It is only available on newer versions such as Powerpoint 2013 and above. If you have an older version, you may need to upgrade to use this feature.
Similar Posts
How to set picture as background in powerpoint for all slides.
Looking to enhance your PowerPoint presentations with captivating visuals? In this step-by-step guide by teacher Regina Griffin from Oregon, US, learn how to set pictures as background in PowerPoint for all slides. From selecting the right image to customizing the background, this article offers useful tips and tricks to elevate your presentations with stunning visuals….
How To Insert Graph In PowerPoint From Excel
Looking to enhance your PowerPoint presentations with dynamic and visually appealing graphs? Explore the benefits of inserting graphs in PowerPoint from Excel. Learn how to Insert graphs in PowerPoint from Excel to save time, ensure accuracy, and update data with a step-by-step guide by Regina Griffin, a teacher in Oregon, US. Discover how to create,…
How To Make A Pecha Kucha In Powerpoint
Looking to create a dynamic and engaging presentation using PowerPoint? We explore the concept of Pecha Kucha and discuss why PowerPoint is the perfect tool for this unique presentation format. Delve into the benefits of using PowerPoint for Pecha Kucha and get a step-by-step guide on creating your presentation. Discover some tips for a successful…
How To Enable Editing In PowerPoint
Are you looking to unlock the full potential of PowerPoint but not sure how to enable editing? In this tutorial by Regina Griffin, a teacher from Oregon, US, we will explore Powerpoint. We cover understanding what PowerPoint is and why it is useful, accessing and downloading it on various devices, enabling editing, troubleshooting tips, and…
How To Play One Slide After Another In PowerPoint
Are you looking to elevate your PowerPoint presentations? Learning how to play one slide after another can make a significant difference in engaging your audience, saving time, and presenting professionally. This tutorial will guide you through setting up your slides for continuous playback and sharing tips and tricks to enhance your presentation with smooth transitions…
How To Insert Hyperlink In PowerPoint
Have you ever wondered what a hyperlink is and how it can enhance your PowerPoint presentations? We will explore the ins and outs of hyperlinks in PowerPoint, how they work, why they are beneficial, and how to insert them into your slides. Whether you want to create easy navigation, interactive presentations, or a professional look,…
Critical PowerPoint Shortcuts – Claim Your FREE Training Module and Get Your Time Back!

PowerPoint’s hidden laser pointer (and how to use it)
- PowerPoint Tutorials
- Shortcuts & Hacks
- January 19, 2024
Did you know that PowerPoint includes a free (hidden) laser pointer option that you can use without having to buy one? Even if you have a differetn pointer you like to use, this built in pointer is a great backup whenever you need it. It also comes in three colors too (red, green, and blue).

Table of Contents
[watch] the powerpoint laser pointer in action.
You are currently viewing a placeholder content from YouTube . To access the actual content, click the button below. Please note that doing so will share data with third-party providers.
Take your PPT skills to the next level
Why is a pointer useful during a powerpoint presentation.
A laser pointer is useful for highlighting or pointing out exactly what you want your audience to focus during your presentation. In other words, instead of trying to verbally tell somewhere where to look on your slide, you use your pointer to point it out.
For example, if you want to bring attention to the 100% year-on-year growth on your slide, you can simply use PowerPoint’s laser pointer to point it out on your slide.

The more content you have on your slide, the more useful it is to point out what you are talking about with your laser pointer.
In the same way, you could use it to highlight:
- Different rows in a table
- The different people on your team (as you talk about them)
- Ideas for a marketing campaign as you highlight them
In short, a laser pointer allows you to better control the ebb and flow of your presentation, by pointing things out on screen while you talk about them.
While there are probably a million different laser pointers you can use, the one I use most is the hidden laser pointer in PowerPoint. Read on to see how to use it.
How to change your cursor into a laser pointer
There are two different ways to turn your cursor into a laser pointer in PowerPoint. The first is using your mouse, the second is the laser pointer shortcut. Let’s start with your mouse first.
The advantage of this first technique is it locks the laser pointer, so you don’t have to hold any keys down on your computer. On top of that, once you turn it on using your mouse like this, the laser pointer remains on as you advance through your presentation. So you don’t have to turn it on for every slide.
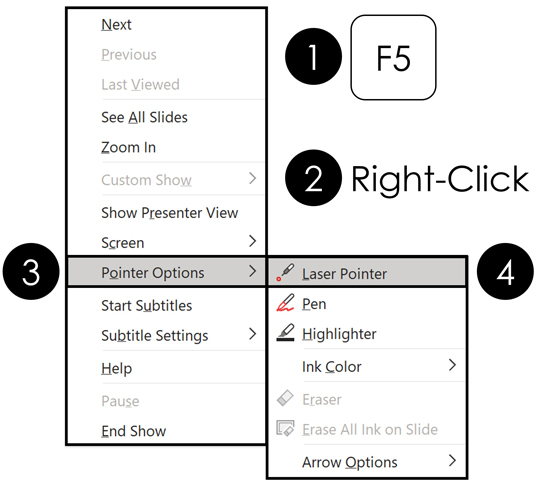
To turn your mouse cursor into a laser pointer during your PowerPoint presentation, simply:
- Hit F5 to start your Slide Show ( see my guide here for other slide show shortcuts )
- Right-click your slide
- Open the Pointer Options
- Select Laser pointer
Doing so, your mouse cursor becomes a colored pointer that you can drag around on your screen to highlight things in your presentation as pictured below.
NOTE: You cannot change the color of the pointer while giving a presentation. If you want a different color, you need to change its color before you run your presentation

Turning off the laser pointer

There are two ways to turn the laser pointer off in PowerPoint. The first is simply to hit the Esc key on your keyboard. Hitting Esc, the laser pointer reverts back to the normal mouse cursor.
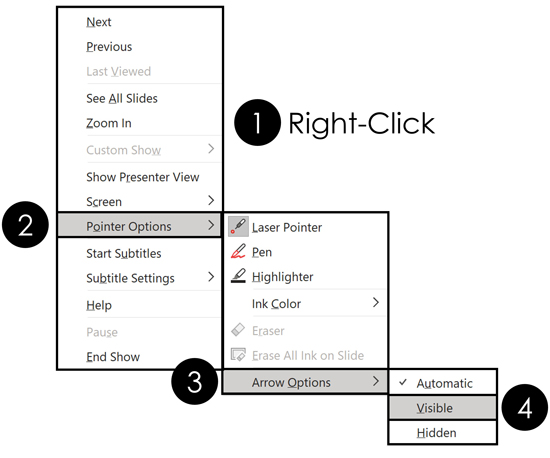
An alternative way to turn the laser pointer off, is simply to change it into something else. You can do that as follows:
- Right-click your slide in Slide Show view
- Select Pointer Options
- Select Arrow Options (or choose Pen or Highlighter)
- Select Visible
Selecting Visible turns your mouse cursor back into the normal PowerPoint arrow cursor.
Laser pointer shortcuts
My favorite way to use the laser pen is simply to use its shortcut. That’s becuase using shortcuts make everything easier in PowerPoint AND saves you a ton of time.
NOTE: If you want to learn all the best PowerPoint shortcuts and tricks, they are all inside our PowerPoint Pro Membership here .

To use this shortcut, simply hold the Ctrl key on your keyboard, then click and drag with your mouse. Doing so turns your cursor into the laser pointer color you have selected (red is the default).
When you are done, simply let go of the Ctrl key and the pointer disappears. This is a fast and easy way to highlight things in your presentation on the fly and impress your clients and colleagues.
I personally find this to be the fastest way to turn the laser pointer on and off. In the picture below, you can see what the blue laser pointer looks like in PowerPoint.
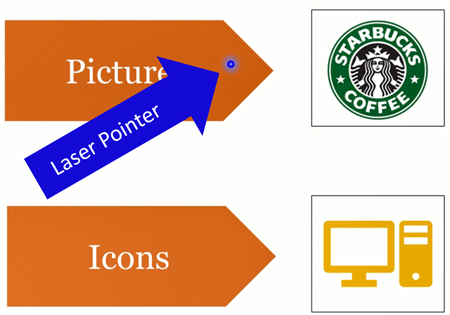
You can alternatively lock the laser pointer by hitting Ctrl + L on your keyboard. This locks the laser pointer, so you don’t have to hold down anything on your keyboard (like with the previous shortcut).

To unlock the pointer when you are done with it, simply hit the Esc key to return to the normal mouse cursor.
How to change the laser pointer color
PowerPoint has three different laser pointer colors you can choose from in PowerPoint. Red is the default color, but you can easily change its color to green or blue.
By default, the the PowerPoint pointer is red, but you can easily it to green or blue if you want to, through the Set Up Slide Show dialog box.
Just be aware that you need to set the color before you run your presentation.

- Click the Slide Show tab
- Select the Set Up Slide Show command
- Open the Laser Pointer Color options
- Choose a color (red, green, or blue)
QUESTION: Does changing the laser pointer color change it’s color for all my presentations?
The color you choose for your pointer is saved in the PowerPoint presentation you changed it for. It is not set as the new default color for all your PowerPoint presentations. So, feel free to change your pointer color to best match the template / presentation you are working with.
By default, PowerPoint always starts with a red laser pointer. So unless you need a color other than red, you do not need to worry about changing it.
Does the pointer work when presenting two presentations at the same time?

The answer is yes (as you can see pictured above).
For example, if you are running an English and Chinese version version of your presentation at the same time for two different audiences (which is what we did all the time when I was living in China), the laser pointer still works in each presentation.
The catch is, you need to use the laser pointer shortcut (discussed above), and make sure you click into each presentation before you use it. To see how to set up two presentations to run at the same time as pictured above, see my guide here .
Why bother changing the pointer color?
The most important reason to change the color of your pointer, is so that it stands out against your slide background.
Notice in the picture below, how much clearer the green laser pointer is against the red slide background, than the red one is. If your audience cannot see the color against your slide background, then using the laser pointer is meaningless.

The same would be true if you were using a blue or green presentation background.
In short, you want a high contrast between your pointer color and the PowerPoint background color you are using for your presentation. That way your audience can clearly see what you are trying show them.
So that’s how to use PowerPoint’s built-in laser pointer and change its color between red, green and blue to have high contrast against your presentation.
This is one of those cool PowerPoint features that few people know how to use. And now that you know how to use it, you can take advantage of it during your presentations.
If you enjoyed the depth of this PowerPoint tutorial and want to learn more about our PowerPoint training courses and free resources, visit us here .
🔒 Unlock the PowerPoint Shortcuts Trusted by Industry Leaders KKR, American Express, HSBC, and More!
Join over 114,880 professionals from diverse fields including consulting, investment banking, advertising, marketing, sales, and business development who have supercharged their PowerPoint game with our proven methods.
✅ Customize compelling presentations effortlessly.
✅ Master time-saving techniques for faster deck creation.
✅ Boost your career prospects with top-notch PowerPoint skills.
Get FREE access to the Critical PowerPoint Shortcuts module of our premium training course by entering your name and email below.
DISCLAIMER: PC Users Only!
We respect your privacy and will keep your info safe and confidential.
Related Articles
About the author.
Popular Tutorials
- How to Strikethrough Text (l̶i̶k̶e̶ ̶t̶h̶i̶s̶) in Word, Excel & PowerPoint
- How to Make Animated Fireworks in PowerPoint (Step-by-Step)
- Strikethrough Shortcut (l̶i̶k̶e̶ ̶t̶h̶i̶s̶) for Word, Excel & PowerPoint
- How to Create a Flash Card Memory Game in PowerPoint (Like Jeopardy)
- Keyboard Shortcuts Not Working: Solved
PowerPoint Tutorial Categories
- Strategies & Opinions
- Presentation Design
- Pictures, Icons, Videos, Etc.
- New Features
- Miscellaneous
- Charts & Data Viz
We help busy professionals save hours and gain peace of mind, with corporate workshops, self-paced courses and tutorials for PowerPoint and Word.
Work With Us
- Corporate Training
- Presentation & Template Design
- Courses & Downloads
- PowerPoint Articles
- Word Articles
- Productivity Resources
Find a Tutorial
- Free Training
- For Businesses
We help busy office workers save hours and gain peace of mind, with tips, training and tutorials for Microsoft PowerPoint and Word.
Master Critical PowerPoint Shortcuts – Secure Your FREE Training Module and Save Valuable Time!
⌛ Master time-saving expert techniques.
🔥 Create powerful presentations.
🚀 Propel your career to new heights.
We value your privacy – we keep your info safe.
Discover PowerPoint Hacks Loved by Industry Giants - KKR, AmEx, HSBC!
Over 114,880 professionals in finance, marketing and sales have revolutionized their PPT skills with our proven methods.
Gain FREE access to a full module of our premium PowerPoint training program – Get started today!
We hate spam too and promise to keep your information safe.
You are currently viewing a placeholder content from Facebook . To access the actual content, click the button below. Please note that doing so will share data with third-party providers.
How-To Geek
Turn your mouse into a laser pointer in powerpoint.

Your changes have been saved
Email is sent
Email has already been sent
You’ve reached your account maximum for followed topics.
Quick Links
Turning your mouse into a laser pointer, changing the color of your laser.
Using a laser pointer is a great way to focus the audience on a specific part of your presentation. If you don’t happen to have one on hand at the time of your presentation, then you can use PowerPoint’s neat little setting to turn your mouse into a laser pointer. Here’s how.
Microsoft came to the rescue with its PowerPoint 2010 release, getting presenters who forgot their laser pointer out of a pinch by providing a feature that converts the mouse into a laser pointer.
Enabling this feature is quite simple. In fact, you can do it during the actual presentation.
Once you’ve started your presentation and you want to change your cursor into a laser, press and hold the “Ctrl” key while clicking and holding the left mouse button.
As you can see in this GIF, we want to draw attention to “How-To Geek” in the question, then show the correct answer. You can also see that the cursor converts back to a pointer when you let go of the left mouse button, so be careful.
The default laser color is red, which might not work well depending on the color of your slides. To change the color of your laser, switch to the "Slide Show" tab in your presentation and then click the “Set Up Slide Show” button.
In the Set Up Show window, click the button next to “Laser pointer color” in the “Show options” section.
A menu with three colors will appear. Here, you can select either red, green, or blue. Once you’ve chosen your color, click “OK.”
These are the only available options, so choose the background color of your slides carefully if you plan on using the laser pointer feature.
- Microsoft Office
- Office 2016
- PowerPoint Training
Use PowerPoint's Laser Pointer
How to Use PowerPoint's Laser Pointer

PowerPoint Training Features:
Interactive bite-sized lessons
Get Certified
Accurate skill assessments
Customizable, LMS-ready content
4.9 out of 5 on G2
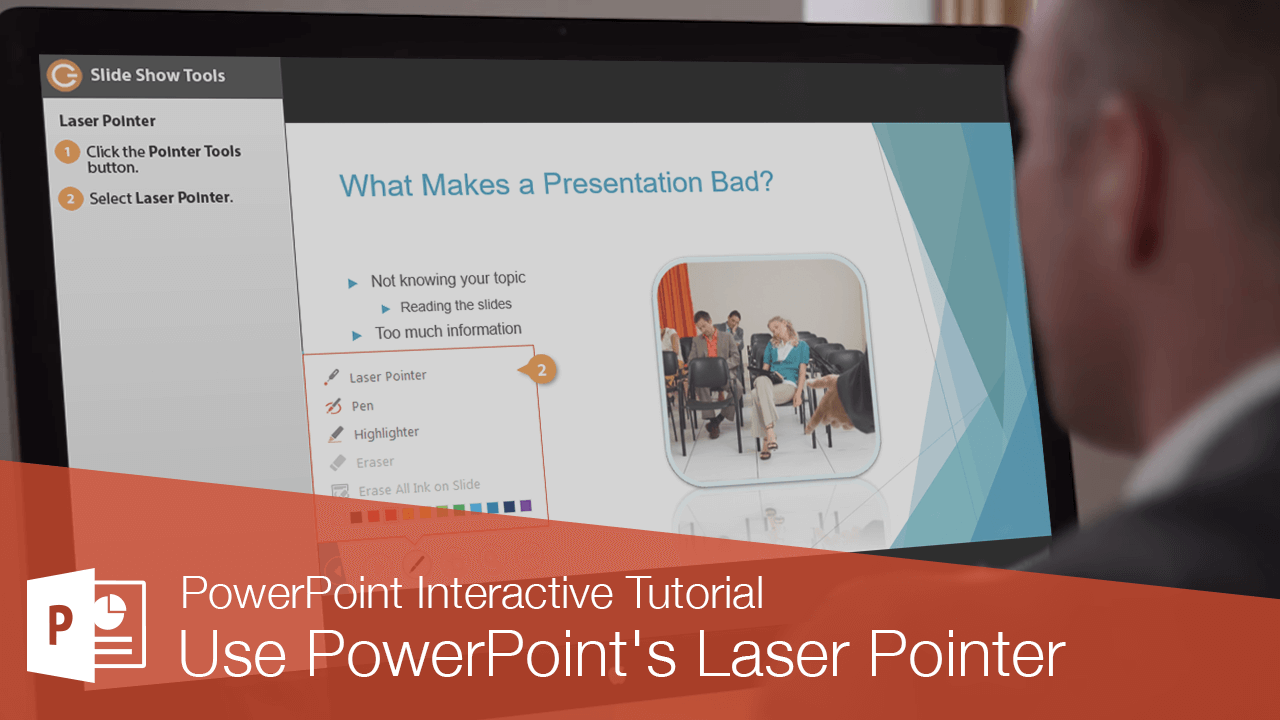
Once you have started a presentation, PowerPoint has tools that you can use to enhance your viewers’ experience.
Laser Pointer
The Laser Pointer tool will display a red dot on the screen that you can use to direct the attention of your viewers.
- While presenting, click the Pointer Tools button.
The pointer turns to a red dot.

- Press Esc to turn off the Laser Pointer.
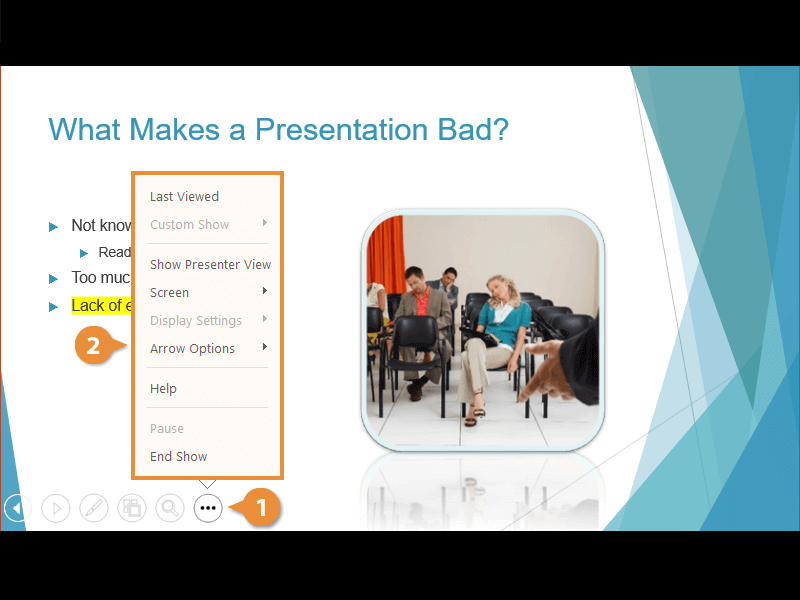
To control whether the cursor is always hidden, always visible, or automatically appears and disappears, click the Options button and then select Arrow Options .
Annotations
There are two tools—a Pen and a Highlighter—that you can use to annotate the slides from within the presentation.
- Click the Pointer Tools button.
No matter which pen tool you select, you can change its color at the bottom of the menu.

The arrow pointer changes shape, depending on the type of pen you selected.

- Press Esc to turn off the annotation tool.
Although you should make sure everything on your slide is big enough to see, there may be times when you want to zoom in on something.

Some of the screen is washed out. What's still visible is the zoom area.

The area in the zoom box now fills the screen.
- Press Esc to zoom out and view the entire slide once again.
Options Menu
The Options menu contains more settings that you can use to control how the presentation plays.
- While presenting, click the Options button.
- Last Viewed : Jumps to the last viewed slide.
- Show Presenter View : Turns on Presenter View and gives you additional views and controls for presenting content.
- Screen : Hide presentation content by temporarily showing a black or white screen, or display the taskbar on screen.
- Arrow Options : Choose whether the cursor is visible, hidden, or automatically hidden after a given amount of time.
- Help : Opens the Slide Show Help dialog box where you see options for navigating the presentation.
- End Show : Stop presenting and return to PowerPoint.
FREE Quick Reference
Free to distribute with our compliments; we hope you will consider our paid training.
- LinkedIn-ready certificate
- Skill assessments
- Bite-sized, interactive lessons
- Saved progress

IMAGES
VIDEO
COMMENTS
Change the color of your laser pointer. By default, the color of the pointer is red, but green and blue are also available. To change the color of the laser pointer, do the following: In Slide Show mode, click the Laser Pointer icon at the lower left portion of the slide:
To change the mouse pointer into a laser pointer using the context menu: Start a slide show. Right-click on the slide. A drop-down menu appears. Select Pointer Options and then Laser Pointer. Press ESC to hide the laser pointer. The context menu appears as follows when you right-click during a slide show: Change the color of the laser pointer
A smartphone can be a laser pointer when you're showing a PowerPoint presentation in a meeting. Open your presentation in Presenter view on your mobile device to use it as a remote control. Advance through the slides with a touch, and emphasize interesting things with the laser pointer. Watch this video for a brief demonstration:
How to activate laser pointer in PowerPoint. This will activate the PowerPoint laser pointer you can now use by moving the mouse or touchpad. Laser point cursor in PowerPoint How to Deactivate Laser Pointer. You can deactivate the laser pointer by hitting Esc on your computer or via the right-click menu by going to Pointer Options -> Laser Pointer.
Benefits of using a laser pointer The laser pointer has the following benefits: Improves the presentation: Using a laser pointer makes it easier to highlight your slides and retain the audience's attention throughout the entirety of your presentation. Allows for ease of movement: The laser pointer also makes it easier for you to move around during your presentation and leave your audience with ...
Adjusting the laser pointer colors can help ensure your audience can easily track your focus during critical points of the presentation. Steps to Change Pointer Color. To change the laser pointer's color, follow these steps: Go to the Slide Show tab in PowerPoint. Select the Set Up Slide Show command. Locate the Laser Pointer Color dropdown menu.
To get a laser pointer in PowerPoint, simply click on the "Slide Show" tab at the top of the screen. Then, click on the "Set Up Show" button and check the box next to "Use Pen as Pointer." This will enable your mouse to act as a laser pointer during your presentation. Can I change the color of the laser pointer in PowerPoint? Yes ...
In short, a laser pointer allows you to better control the ebb and flow of your presentation, by pointing things out on screen while you talk about them. While there are probably a million different laser pointers you can use, the one I use most is the hidden laser pointer in PowerPoint. Read on to see how to use it.
Turning Your Mouse into a Laser Pointer Microsoft came to the rescue with its PowerPoint 2010 release, getting presenters who forgot their laser pointer out of a pinch by providing a feature that converts the mouse into a laser pointer. Enabling this feature is quite simple. In fact, you can do it during the actual presentation.
Once you have started a presentation, PowerPoint has tools that you can use to enhance your viewers' experience. Laser Pointer. The Laser Pointer tool will display a red dot on the screen that you can use to direct the attention of your viewers. While presenting, click the Pointer Tools button. Select Laser Pointer. The pointer turns to a red ...